Pages

Thursday, 16 February 2012

Bindings in Silverlight - Creating Sample Data

One of the powerful features of Silverlight is the ability to bind information to controls. Not only data but also styles and templates can be bound to controls in XAML.
We will cover the Bindings in a mini series of posts.   After completing this series, you will find answers to questions such as
What is the syntax for binding?
To what controls can you bind?
Can you change the values / format of data that you are binding?
The structure of this mini-series will be as follows      
1)      One way Data Binding {Just getting the data from the source and displaying it  }
a)      Binding simple data to the Data Grid
b)      Binding user classes to data grid
c)       Binding Data Grid data to Textbox  -  Introduction to Converters
d)      Binding Data to list box
2)      Using Data Templates to present data
In this introductory post however, we will see various ways of fetching sample data for our binding. We will also see the various screens where you can do data binding easily using Visual Studio/Expression Blend.     
The simplest way to get data is to create your own data in the program. You can make use of the simple data types, or you can create your own classes and pass those objects individually, or you can make collections and pass them.
But you can also let Expression blend do that work for you.  Simply click a few buttons and generate as much sample data as you want.  In order to do this, first create a new project and go to the Data tab.

If you are unable to locate the Data tab, then please enable it from the Window context menu.

In your data tabb, you have the Add data Symbol (Shown like a Database icon with a + Symbol). When you click it, you get options from where to create data.

Choose the “New Sample Data” option, since we don’t have any existing data.

When you press OK, the sample data will be added to the Data tab.  You can see that a Sample data source, with a default collection is created.

If you observe this screen, you can notice several things.
1)      You can create as many sample sources as you like
2)      Each sample source can have as many collections as you like
3)      Properties are customizable
For example, when you click on the right symbol of a property, you get options to change parameters.

 Right now, it is a string.  But you can set it to various types, including image. For now, we will change the format of the string to Name

In your Xaml page, now drag a Data Grid.  You can also drag the collection on a Combo Box or list box. When you are dragging the collection, it will appear like this. 

Once you drop it, data will be bound and it will appear like this
       
If you will take a look at the XAML file, you will see auto generated bindings for you.

We will cover how to create such bindings for our own data and explore further in the Series. I hope you can create sample data now, for testing your bindings. We will be fetching most of our data from collections , either from a web service, or user defined Collections very shortly.

MVVM implementation in Expression Blend

The Model – View – View Model Pattern, also known as MVVM helps us create very scalable and efficient WPF/Silverlight applications that have some sort of Data access functionality. This is because of its clear separation of elements, just like the MVC Pattern.  
The User interface (UI) is separated from the Data and business logic, and put into a separate layer called the View.  There can be many views for an application, and any changes you make to your view do not affect your other layers.   This very property makes it easy for development teams to focus exclusively on design, or create several Views having different ways to access data. It also makes it convenient for skinning the UI.
Next in the pattern comes the Model.  This contains/provides the data classes necessary for the application. Your Model does not have any interaction with the View.  Its only task is to represent data from the database/external sources.  Since the View and Model are unaware of each other, you can have multiple models, which can be interchanged if necessary.  This makes it convenient to access data from various kinds of data sources, without the user not having to change the interface at all.
And finally, the most important part of this Pattern, the ViewModel.  The View model can respond to the changes in the UI through commands. The commands cause some methods to be fired, which change the properties of the view.  It can access data from the Model, which in turn is accessible to the View.
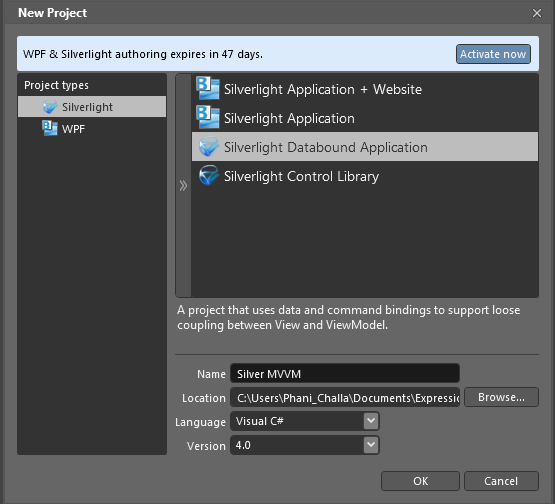
We will be building an application that does no data access for now.  Our focus will be on the View and the ViewModel.  So create a new Data Bound Silverlight Application in expression Blend.  I am using Blend 4.0.   Name the application as Silver MVVM, and press Ok.

This Silverlight Data bound Application template creates the default structure for your project, including Sample Data, a View Model, and a View.  Here the Sample Data acts as a Model.
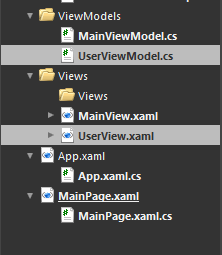
The project structure that gets created is shown below.

The View contains all your interaction elements and is the visible UI.  The advantage of using the MVVM pattern is that the code behind file for the view, i.e. MainView.cs here, can be empty without event handlers or any code at all.
The default View contains a textbox and a button. On clicking the button, the text of the textbox is updated. We will be creating a rectangle and a button. Upon clicking the button, the color of the rectangle will change.  We will be modifying the existing code to accommodate the new controls. We will do the following steps while building this project.
1)      Create the new controls in the View
2)      Create the properties and a method in the View Model
3)      Binding the properties of the View model to the view in XAML

Step 1  -  Modifying the View


This is the default View.

Add the button and rectangle in View.  We don’t need to add a single line of code at all.

Step 2  -  Modifying the ViewModel


For editing the View Model, open the MainViewModel.cs, which is shown below.

Since we are trying to change the color of the rectangle, we will be using the Brush class present in System.Windows.media.  So add a reference to System.Windows.Media  

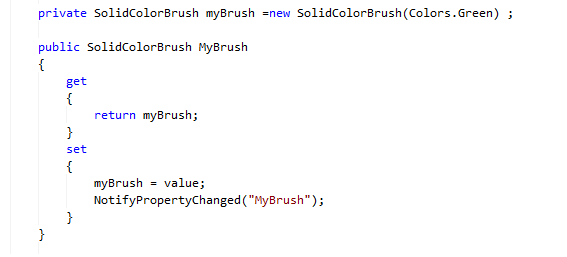
We are exposing a property called MyBrush, which will be bound to the Rectangle in the view.   So we first add that to the View Model.

We also need to write a method that will be called when the button is clicked.  We’ll call that method as ViewRectangleButton ().

Step 3  -  Changing the Bindings in the View XAML.

Open the XAML for the View.  You will find that there are default bindings for the existing button.

When you create 2 controls, the rectangle and the button, the following code will be added.


Change the code by Binding the Fill of the rectangle to MyBrush, and the MethodName to ViewRectangleButton.


T  That’s it.  You have successfully enabled the button click to change the Rectangle color.
           Before Click                                                        After Click


Additional Steps

If you want to create a new user control that also follows MVVM, you already have existing item templates for that.  Click on “Add New Item” in the Solution explorer, and you will be presented with various options.

Select the User Control with ViewModel.

It will create a View and a ViewModel, and your project structure will now look like this .

You can use the same steps to implement complex bindings and add new functionality using the MVVM pattern.

Tuesday, 13 December 2011

Lesson 8 : A little of ADO.net

Hi.  I hope you are finding the lessons easy to follow.  Now that we know how to access data from a web service,  we should take a look at accessing data from a database . I will be using ADO.net here to get data to the web service.  This is very important, because most of our applications will be storing their data in databases, and our application needs to access this data.

We will be covering the following topics in this lesson:

1) Connecting to database
2) Accessing a single value, and  range of data
3) Handling data into Custom classes.
4) Inserting into the database

Step 1:  Connecting to a database.

1) Create a new Silverlight Project, and name it Lesson8.
2) Add a WCF service as a new project to the solution and name it DatabaseService1
3) Open the Service1.svc.cs
   You can observe that some namespaces are added by default to the code.
   To access data from the database, specifically SQL Server, we need to add the following namespaces:

   System.Data;
   System.Data.SqlClient;


4a) The System.Data  namespace contains the DataTable and related classes, that are used to store the data retrieved from the database.
4b) The System.Data.SqlClient   namespace contains the classes specific for accessing data from Sql Server. 


5)  Now, we need to establish a connection to the Sql Server, and access data from a database.

6)  Now , there is a Tool for using Sql Server,  Microsoft Sql Server Management Studio, that comes with Microsoft Sql Server 2008 .  Go to Start Menu -> Microsoft Sql Server 2008 -> Management Studio.


7) To the left of the screen, you will find Object Explorer pane.  You can create a new Database in it by clicking on Databases- > New database


8) A prompt opens for the Database name.   Name it Sample Data , and press ok.

            
9)  In the object explorer pane, now expand the databases tab to find the newly created Sample Data   database.   Expand it to find the Tables group.  You can right click on it and Add a new Table.


10) Let us create a table called Users, with three fields,  Name, emailid  and Password . the data type for all the 3 fields is varchar(50) . Uncheck the Allow Nulls checkbox.

              
11) Save the table by pressing Ctrl+S . A prompt appears for the table name. Name it Users

12) Now in the Object Explorer, go to the Sampledata database, then to tables group and expand it.  You should see the dbo.Users  table present there.  Right click on that and select "Edit top 200 rows"


13)  Now you should be able to enter sample data there.
14) Note the name of your server. It is present in the tab above the sample data here.


 Thats all we want with sql Server Management studio. Save it  and we can go back to Visual Studio now.


Step 2a: Accessing a Single value 

1) In the Service1.svc ,  create a new method  public void getData()
   
2) Inside this, we first need to connect to the Sql Server database, so we use the SqlConnection class to create this. Add the following code in the getData()  method.  Change the YOUR_SERVER_NAME_HERE
to your Server name.


string connectionString="Initial Catalog=SampleData;"+"Data Source=YOUR_SERVER_NAME_HERE ;"+"Integrated Security=SSPI;";SqlConnection sCon = new SqlConnection(connectionString);  
Initial catalog refers to your Database name.
Data Source is your server name
The authentication is default windows authentication, so we use Integrated Security=SSPI 
If your database has a username and password, then you can use
Userid="user_name" ; Password="Password"

For now, we will use this  above connection string.

3)  We need to execute a Command to get data from the database.   So we will create a SqlCommand to get the data. Add the following code

string
sqlCmd = "Select emailid from Users where name='a'";SqlCommand scmd = new SqlCommand(sqlCmd, sCon);
4a)  We enclose our entire data access code within a try - catch- finally block, so that any exceptions can be handled. 

4b) Add the following code after the above statements
    try    {
    }

    {
    }    catch (Exception exc)    finally    {
    }
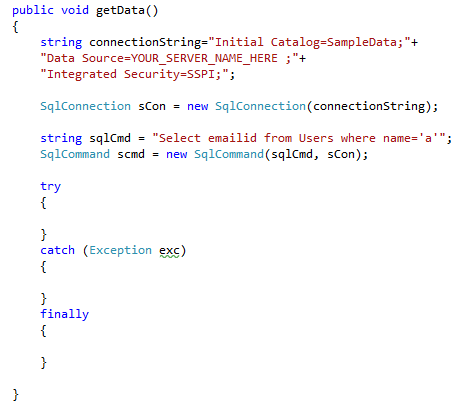
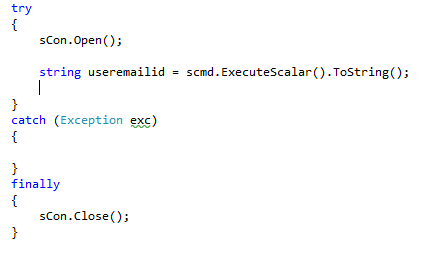
Your code should look something like this now


5) The sqlCmd query returns a single value, the email id  of the user with name 'a'.   Since it is a single value, we can use the ExecuteScalar method of the SqlCommand object.

6a)  Before you run the SqlCommand, you need to open the connection to the database.  So add the following code .
    string useremailid = scmd.ExecuteScalar().ToString();
6b) In the above lines, the connection to the database is opened, and a query for fetching a single value is executed.  that value is sent into the useremailid variable.

6c) We need to close the connection now, so we will close it in the finally block.
      Your code should now look like this


Step 2b: Accessing a range of Data

1) To store a set of values, we need to have a data table , what can hold the data.
     So instead of a string variable we have a DataTable object.

2) So first let us modify our query. We will select all the user names and passwords from the Users table.

3a) Now , inside the try block, we want to create a new DataTable object, and a SqlDataAdapter object.
    the SqlDataAdapter gets the range of data and stores it in the DataTable.
   Add the following code to the try block

   sda.Fill(dt);

   Add the following code to the try block

3b)  Notice that we dont need to open the sql connection.  The SqlDataAdapter automatically opens the connection and closes it.  That means you can remove the sCon object as well as  sCon.Close();   also.
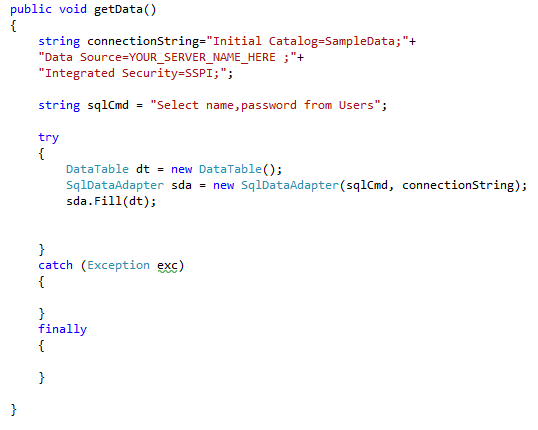
The final code should look like this.   DataTable dt = new DataTable(); 
   SqlDataAdapter sda = new SqlDataAdapter(sqlCmd, connectionString);  
   string sqlCmd = "Select name,password from Users";    

We wont be using the  SqlCommand object ,  scmd  , to fetch the range of data , so you can remove it.


4) The data table now contains all the names and passwords of the users. 

Step 3: Handling data into custom classes

1) Now we have to  handle this data temporarily .We will create a custom class classed MyUsers, and store this data into it  . Add the following code to the IService1.cs.

    [DataContract]
    public class MyUsers
    {
       string username;
       string password;
    }

   
2)  Now right click on the variables and select Refactor->Encapsulate Field.
     string username;     string password;

3) Now a prompt appears for the name. Press Ok.
   
4)  Repeat the procedure for the email id variable also.

5)  Your custom class is ready.


6) Now we need to assign the data into objects of this class. Go to the try block in Service1.svc.cs , where you have filled data into the data table.  We can create a list of type MyUsers, which will store the data.


    List<MyUsers> myUsers = new List<MyUsers>();
    foreach (DataRow dr in dt.Rows)

7)  In the above code, we are looping through each row of the data, using the foreach loop . Create a new object of type myusers, and add the data from the data row into it.


    MyUsers mTemp = new MyUsers();
    mTemp.Username = dr["name"].ToString();
    mTemp.Password = dr["password"].ToString();   
    myUsers.Add(mTemp);   


8)   This ensures that all the data from the data table is converted into the class objects, and stored in that list.

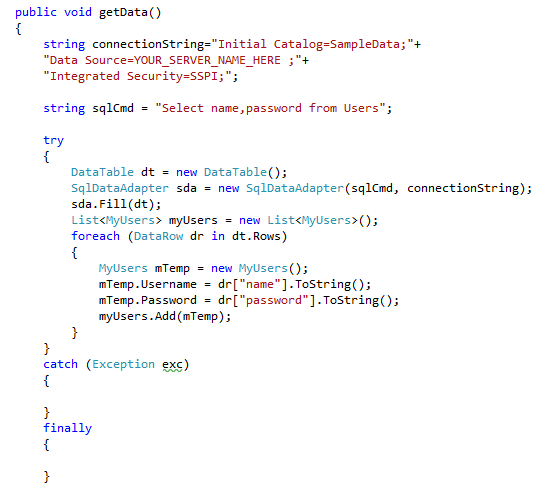
9)  If you have to pass this data to silverlight, you need to change the return type of the getData() method to List<MyUsers>  and return the myUsers  object. Your final code should look like this


10)  Also, you need to add the following code in the iService1.cs  under the interface iService1


This is how we get data from the Database.

Step 4: Inserting into the database

1)  We make use of the SqlConection and SqlCommand classes to perform the insertion. 
     Since this insert statement is not a query, i.e, we are not fetching data from the database, 
     we can use the ExecuteNonQuery() method of the SqlCommand.

2)  Add a new function insertData() and  the  following code to it.
      public void insertData()    string connectionString = "Initial Catalog=SampleData;" +    "Data Source=YOUR_SERVER_NAME_HERE ;" +    "Integrated Security=SSPI;";    

   {

     string sqlCmd = "insert into Users values('h','h','h')";     SqlConnection sCon = new SqlConnection(connectionString);    


     try 
     {

       sCon.Open();
       int status= sCmd.ExecuteNonQuery();
     }

     {
     }       SqlCommand sCmd = new SqlCommand(sqlCmd, sCon);    catch (Exception exc)     finally     {
       sCon.Close();
     }
  }
As you can notice, the only difference between this insert and fetching the single value data  is the ExecuteNonQuery() and the ExecuteScalar().

3)  The number of rows changed will be stored in the variable status. If this insert is successful, then status=1.
    

This is how we access data from the SqlServer database into our web service, and from this web service into our Silverlight application.  We will see more of this in the video.

Monday, 5 December 2011

Lesson 7: Accessing data from the WCF service.
Now you know how to create a Silverlight application , and create a Wcf Service.
The WCF service runs independently of the Silverlight application.
All we need to do is just send the data from the Web service in to the Silverlight application. 
To do this, we need to follow the below steps:

1. Create a Service Reference in the Silverlight application.
2. Make asynchronous calls to the WCF service methods.
3. Retrieve the data from the WCF service.


Step 1:  Creating a Service Reference

1.  Create a new Silverlight Application, name it lesson 7 .
2.  In the Solution Explorer, Select the Solution, and Right click -> Add New Project


3. Select WCF -> WCF service application, and name it TestWCF.
4.  Now your solution will have 2 projects , the Silverlight Application and the Wcf Service.


5. Build the solution by pressing F6.
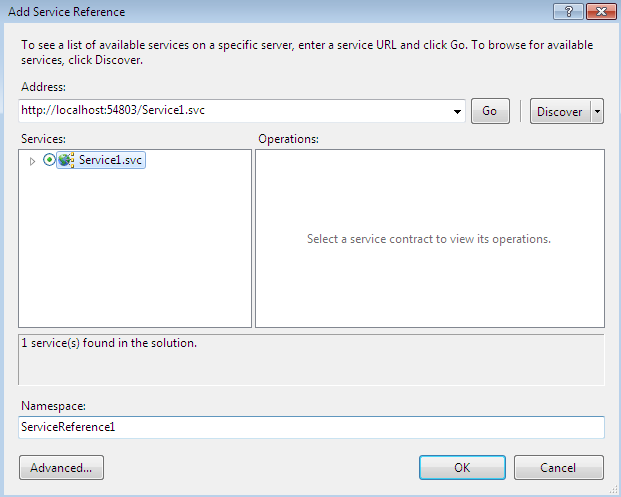
6. Right click on the Silverlight application , and select "Add Service Reference"


6. In the new window that pops up, press Discover.
    The WCF service Service1 will appear. Select it and press OK.

7. When you press OK, the Service Reference will be added to the Solution explorer.
   
 8. Now you can user the namespace ServiceReference1  in your Silverlight application.
     It has the ServiceClient Class, which contains all the methods declared as [OperationContract]

Step 2:  To make asynchronous calls to the WCF service  


1. Inside the MainPage.xaml.cs, we can access the WCf service using the namespace ServiceReference1.
    Create a new class variable    ServiceReference1.Service1Client sClient;
 
2. The method calls to the WCF service will be asynchronous, which means that when you call the method, it does not return the result immediately.

3. The normal execution of the program goes on, and independent of the web service execution. When the web service sends the result ,it raises the completed event.

4. We need to handle the completed event of the methods.
So inside the constructor , i.e  MainPage() , we need to add the following code
    sClient = new ServiceReference1.ServiceClient();
sClient.GetDataCompleted +=

 new EventHandler<ServiceReference1.GetDataCompletedEventArgs> (sClient_GetDataCompleted);

5. You will be prompted to pres TAB , so that the event handler gets created automatically
    
6.  Remove the     " throw new NotImplementedException(); "  from the above event handler.
7.  Before we start, we will drag a button in the MainPage.xaml  in the Silverlight application .
     Double click the button to go to its event handler.
 
8.  Inside the  button click event handler, just call the GetDataAsync method of the web service.
       
    
9. This calls the getData method of the WCF service asynchronously.

Step 3 : Retrieve the data from the WCF service.

1.  In the Completed event handler ( sClient_getDataCompleted ) , we have the variable e as a parameter.
     To obtain the result, we use the property e.Result.
     So display the result in a message box .

2.  Since the return type of the getData was string, we displayed it directly.  If it is some other data type, we need to typecat it accordingly.

3. Now you need to add two XML files to your WCF project folder.
    Go to your  WCF service, Right click -> Add new Item - > XML File -> Name it clientaccesspolicy.xml
    Copy this to your clientaccesspolicy.xaml and save it.
 
<?xml version="1.0" encoding="utf-8"?>
<access-policy>
  <cross-domain-access>
    <policy>
      <allow-from http-request-headers="*">
        <domain uri="*"/>
      </allow-from>
      <grant-to>
        <resource path="/" include-subpaths="true"/>
      </grant-to>
    </policy>
  </cross-domain-access>
</access-policy>

4. Similarly add another xml file and name it crossdomain.xml and add the following code to it.

<?xml version="1.0"  ?>
<!DOCTYPE cross-domain-policy SYSTEM "http://www.macromedia.com/xml/dtds/cross-domain-policy.dtd">
<cross-domain-policy>
  <allow-http-request-headers-from domain="*" headers="*"/>
</cross-domain-policy>
5.  Now press F5 and Run the project .  Click on Button , to see the result.


Thats how we access data from a WCF service.  To see more on how to access data from databases, watch this video.