Pages

Monday, 5 December 2011

Lesson 7: Accessing data from the WCF service.

Now you know how to create a Silverlight application , and create a Wcf Service.
The WCF service runs independently of the Silverlight application.
All we need to do is just send the data from the Web service in to the Silverlight application. 
To do this, we need to follow the below steps:

1. Create a Service Reference in the Silverlight application.
2. Make asynchronous calls to the WCF service methods.
3. Retrieve the data from the WCF service.


Step 1:  Creating a Service Reference

1.  Create a new Silverlight Application, name it lesson 7 .
2.  In the Solution Explorer, Select the Solution, and Right click -> Add New Project


3. Select WCF -> WCF service application, and name it TestWCF.
4.  Now your solution will have 2 projects , the Silverlight Application and the Wcf Service.


5. Build the solution by pressing F6.
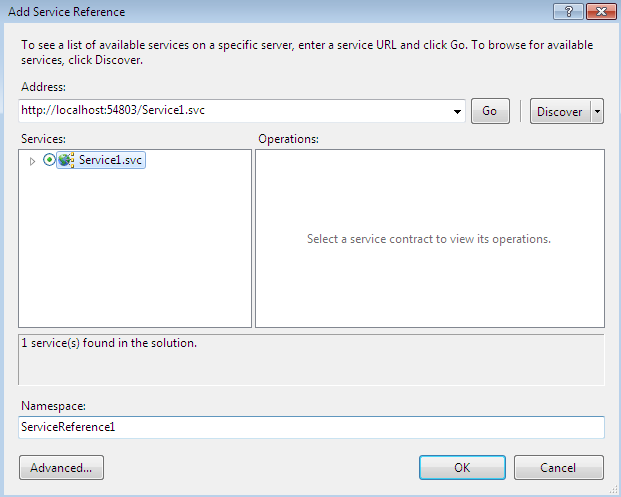
6. Right click on the Silverlight application , and select "Add Service Reference"


6. In the new window that pops up, press Discover.
    The WCF service Service1 will appear. Select it and press OK.

7. When you press OK, the Service Reference will be added to the Solution explorer.
   
 8. Now you can user the namespace ServiceReference1  in your Silverlight application.
     It has the ServiceClient Class, which contains all the methods declared as [OperationContract]

Step 2:  To make asynchronous calls to the WCF service  


1. Inside the MainPage.xaml.cs, we can access the WCf service using the namespace ServiceReference1.
    Create a new class variable    ServiceReference1.Service1Client sClient;
 
2. The method calls to the WCF service will be asynchronous, which means that when you call the method, it does not return the result immediately.

3. The normal execution of the program goes on, and independent of the web service execution. When the web service sends the result ,it raises the completed event.

4. We need to handle the completed event of the methods.
So inside the constructor , i.e  MainPage() , we need to add the following code
    sClient = new ServiceReference1.ServiceClient();
sClient.GetDataCompleted +=

 new EventHandler<ServiceReference1.GetDataCompletedEventArgs> (sClient_GetDataCompleted);

5. You will be prompted to pres TAB , so that the event handler gets created automatically
    
6.  Remove the     " throw new NotImplementedException(); "  from the above event handler.
7.  Before we start, we will drag a button in the MainPage.xaml  in the Silverlight application .
     Double click the button to go to its event handler.
 
8.  Inside the  button click event handler, just call the GetDataAsync method of the web service.
       
    
9. This calls the getData method of the WCF service asynchronously.

Step 3 : Retrieve the data from the WCF service.

1.  In the Completed event handler ( sClient_getDataCompleted ) , we have the variable e as a parameter.
     To obtain the result, we use the property e.Result.
     So display the result in a message box .

2.  Since the return type of the getData was string, we displayed it directly.  If it is some other data type, we need to typecat it accordingly.

3. Now you need to add two XML files to your WCF project folder.
    Go to your  WCF service, Right click -> Add new Item - > XML File -> Name it clientaccesspolicy.xml
    Copy this to your clientaccesspolicy.xaml and save it.
 
<?xml version="1.0" encoding="utf-8"?>
<access-policy>
  <cross-domain-access>
    <policy>
      <allow-from http-request-headers="*">
        <domain uri="*"/>
      </allow-from>
      <grant-to>
        <resource path="/" include-subpaths="true"/>
      </grant-to>
    </policy>
  </cross-domain-access>
</access-policy>

4. Similarly add another xml file and name it crossdomain.xml and add the following code to it.

<?xml version="1.0"  ?>
<!DOCTYPE cross-domain-policy SYSTEM "http://www.macromedia.com/xml/dtds/cross-domain-policy.dtd">
<cross-domain-policy>
  <allow-http-request-headers-from domain="*" headers="*"/>
</cross-domain-policy>
5.  Now press F5 and Run the project .  Click on Button , to see the result.
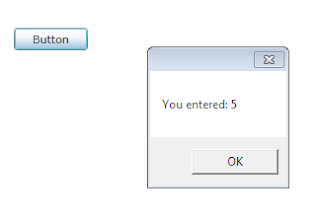


Thats how we access data from a WCF service.  To see more on how to access data from databases, watch this video.

Saturday, 3 December 2011

Lesson 6: Introduction to WCF services.

In Silverlight, you cannot connect to a database directly. You can create visually appealing interfaces, handle events, make user controls , use all logic and .net framework , but you cannot connect directly to a database.

To access data, the Silverlight application needs to call a Web service, which supplies it with data.  The Windows Communication Foundation (WCF) provides you a way to access all your databases by writing all the data access logic within it, and your silverlight application can request data from this WCF service.

Before we create a WCF service, you need to keep in mind that the Web service and the Silverlight application are different applications , that merely exchange data. I am going to show you how to create your first WCF service .

There are only two topics which will be covered in this lesson.
1. Creating the WCF service.
2. Modifying the WCF service.
3. Publishing the WCF service
Step 1:  Creating the WCF service

1. Open Visual Studio -> New Project -> WCF -> WCF Service Application.
    Name it as MyDataService , and click OK.


2.  Open Solution explorer, present to the right of the screen and double click on IService1.cs
     You will find an Interface and a class there.  


3.  The methods in the interface have an attribute  [OperationContract] , which is used to specify that this method can be called from the Silverlight application.

4.  The class has an attribute [DataContract] , which indicates that this class object can be sent from the WCF service to the Silverlight application and vice versa. 

5. Only the members of the class which have [DataMember] attribute will be accessible in the silverlight application.

6.  The methods defined in the interface are implemented in the Service1.cs  file , which is obtained by expanding the Service1.svc  in the Solution Explorer.

7.  If you want to create your own class, with its data members, you need to give the [DataContract] attribute to that class also , and its members should be given [DataMember] attribute.


Step 2 : Modifying the WCF service

1. We will create a new method in the interface IService1.  Add the following code in it

     [OperationContract]
     int getStatus(string name);


2.  Now save this, and go to Service1.svc.cs .  We need to implement the new method defined in the interface. So add the following code there


3.  That all  :)   You have created your web service.  You can call this getStatus method, which takes a string as a parameter, and returns you the status as 1 if length is greater than 10 , and 0 if lesser.


How to actually use these WCF services will be covered in the next lesson. For a more detailed explanation and examples, check this video.


Friday, 2 December 2011

Lesson 5: Working with user controls

You have already seen and used some of the available controls like TextBlock, Button etc in Silverlight . Well, you can create your own controls also, making use of the existing controls. Such controls are also referrred to as User controls.

There may be many reasons to use our own controls, like extending functionality of the control. In this lesson, we will see the following.

1. Creating a simple user control.
2. Adding additional functionality to the user control.
3. Using the user control in our application.

Step 1.  Creating a simple user control.

1. Create a new Silverlight application in Expression Blend and Go to the Project pane on the right.
    Name it Lesson5.
2. Right click on the Lesson5  ->  Add a new Item


3. Now select  User Control  and name it MyButton.xaml


4.  In the toolbar to the left, select the Grid control and double click it.
 

5. Stretch the grid to fit the screen, and change the color of the grid .  To change the color, click the second tab highlighted below and drag your mouse on the colors .   


6. To view the xaml, click on this icon present beside the properties pane.
  
Press V to get the selection tool.
Now Resize the d.DesignWidth  and d.DesignHeight to 450 and 50 respectively


6.  Drag a button and a textbox (right click the textblock icon to get the options)


Press V to get the selection tool.
and arrange the control as shown below

7.  Select the textbox and edit the name of the textbox in the top right corner, as shown in  the picture.
     similarly , chage the name of button to btnSubmit.

8. Remove the content of the textbox, and change the content of button to Submit.


Step 2: Adding functionality to the user control

1.  Now select the button, and click on the events icon in the properties pane and type an event handler name beside Click event.


2. Double click on event handler name to generate the event handler stub.


3.         Now add a public variable to the class.     public string name;
              We will take the text from the textbox and  assign it to the variable name.
          
              So inside the button click event handlet, add the following code.
              name = txtbox1.Text;   


4. Build the project once by pressing Ctrl + Shift + B . and go to MainPage.xaml.
       The user control will now be available in the toolbox to the left.
      ( Click the expand link , and go to the project category inside it. )
     

5.  You can now drag the control onto your grid .  In fact, you can drag multiple copies of the control.
  Add a name to the controls in the top right corner, as mentioned earlier in step 7.  i am giving b1, b2,b3 respectively.

6.  In the Mainpage.Xaml.Cs , you can access the property name  from these controls if you want.


Tha advantage, as you can see is reusability.  Instead of draggin 3 text boxes, and 3 buttons, and assigning event handlers to each of them , we did it only once, and reused the component.    :)   Users controls are very useful , and we'll see more of them in the lessons to come.   For  more detailed examples, please watch the video.

Lesson 4. Event Handling

This lesson will deal with events and how to handle them. You will be using  event handling in every step of application development as you start developing bigger applications. So best get familiar with it right now :)

We will be going through the following topics.

1. Accessing Events for a control
2. Event handling through code.

Step 1: Accessing Events for a control.

1. Create a new Silverlight Application and drag a Button control on to the Grid.
    Right Click ->   Properties  ->   The property pane opens to the right side of the screen.
    Click on the lightning symbol , which represents events.


Different controls have different events associated with them. As you can notice, there are many events associated with this Button control. 

2. To add an event handler for an event, just type a new event handler name beside the event.


3. If you double click the event handler name , you will be taken to the code file and the event handler stub  will be automatically generated.


 4.  You can write your functionality inside this event handler.  For now, i am going to display a message that reads HI.   Add             MessageBox.Show("HI"); inside buttonclick

5. When you  press F5 to Run the application , a message box pops up when you click the button.


You can change the properties of other controls using the event handlers. For example, you could change the background color of the application when you click a button. 


Step 2 :  Event handling through code.

You can add an event handler directly from code instead of doing it from the Properties pane.  In the previous lesson (Lesson 3), we added an event handler for the completed event. 


There are 2 steps to handle an event ,  First step is to associate the event with a handler  and the second step is to write the functionality in the handler.

1.  We add an event handler to a control using the  += operator.   In reality, it uses the concept of delegates {but that concept is not really needed right now}
  
2.  Add a new button to the Grid, and to add a click event to our button, we simply write
     button2.click += .      inside the MainPage()  constructor.
    Visual studio provides auto completion for the event handler by pressing the TAB key twice.

3. Write the MessageBox.Show("Hi")  code inside this method, and press F5 to Run

4. The output will be the same as earlier. 

5. If for some reason you want to remove the event handler at a later stage, then you can use the  -= operator. 

This way , you can handle all the events for any control.  For a more detailed explanation and demo, watch the video.


Thursday, 1 December 2011

Lesson 3 : Animation in Silverlight

Wouldn't you agree that  it would be cool to use animations in our application  ? 

They could be used in many ways, such as a form moving  to a side as it is completed,  or a slideshow ,  or even a page flip animation when you want to continue to the next page.

The applications are limitless, and creating animations is even easier that you might imagine :)  So lets dive in,  and create our first animation , { for this you will need Microsoft Expression Blend }.

We will go through the following concepts in the course of this Lesson

1. Creating the elements to be animated.
2. Creating a Storyboard.
3. Animating elements .
4. Controlling Animation through code.

Step 1 :   Creating the elements to be animated.

1. Open Microsoft Expression Blend and create a new Silverlight Project.


2.  Click on the rectangle control  on the left side of the screen and drag it onto the grid to create a Rectangle.  The properties editor for that rectangle will also pop up to the right side.


3.  You can click on the Colors in the Properties pane to change the colors of the rectangle. In fact, we will  animate this rectangle with different colors as out first task.


Step 2:  Creating a Storyboard.

1. Click on "Objects and TimeLine" at the bottom left corner of Blend , to start creating a Storyboard.


2. Click on the  + button at the Top right side of this "Objects and TimeLine" pane. -> It will open the StoryBoard  creation Dialog.  -> Press OK , to create a StoryBoard with name StoryBoard1


Step 3 : Animating Elements. 

1.  A Time Line appears at the bottom of Blend, showing the time in seconds . We need to create key frames along this timeline.  This has an oval button which creates a new frame.


4. Drag the Yellow Line forward, and change the color of the rectangle.   A new keyframe gets automatically inserted at that point.


5.  There is a small play button above the timeline. Click it to see the preview of the animation

6. You can drag the yellow line forward, and move the rectangle to a new position. Another key frame gets inserted . Now close the storyboard by clicking the X  symbol beside the  +  symbol.

7. If you Press F5  to Run the application , you will see that animation has not started. We need to start it through code.

Step 4:  Animating through Code
  
1. In the Projects Pane present beside the Properties pane,  expand the MainPage.xaml  to show MainPage.xaml.cs


2. Double click on the MainPage.xaml.cs and go to the  Constructor

   Below the InitializeComponent() method, add    Storyboard1.Begin();


3.  Now press  F5  to  Run  the  project.  The animation plays properly, but it plays only once.

4. To play multiple times, you an do it in a number of ways.  The simplest way is to play the animation whenever the completed event is raised.  To do this, add the following code to the constructor

            Storyboard1.Begin();
            Storyboard1.Completed+=new System.EventHandler(Storyboard1_Completed); 

 and add a new event handler ,
        private void Storyboard1_Completed(object sender, System.EventArgs e)
        {
                Storyboard1.Begin();
        }


5.  Now press F5  and Run the application.  You can notice that it will run infinitely.

6.  If you want the animation to run only for a certain number of times or a certain period of time,
you can use the RepeatBehaviour  property of the StoryBoard.  For example, to repeat the animation 20 times,  use the following code  before the StoryBoard1.Begin().

Storyboard1.RepeatBehavior = new RepeatBehavior(3);


This way, you can control your animation using code. Hope you can explore the other options .  For more detailed examples and animation properties, watch this video .


Lesson2 : Your First multi page Silverlight application

A website may usually have more than one page. These pages may be related and need to accessible from the other pages.  We will see how this can be done in Silverlight.
In this lesson, we are going to develop a Multi-Page application, keeping the following goals in mind.
1.        Creating new pages.
2.       Adding content to page.
3.       Navigating between pages.
4.       Conditional Navigation.


Step 1.  Creating a new Page.
Create a new Silverlight Application Project in Visual Studio. Name it Lesson 2. Now go to solution Explorer and right click on Lesson2.     Go to Add ->  Add New Item.


Now Add a new Silverlight Page from the available options.

By default, it is Page1.xaml.  You can rename it if you want.  I am going to rename it to Home.xaml
Similarly add  two more pages , and name them  Page1.xaml  and Page2.xaml


Step 2.   Adding Content To Pages

On the main page, add three buttons . ->  Right click on the buttons -> go to Properties  ->In the properties pane to the right side,  change the Content to them Home, Page1 and Page2 (respectively).    
We will try to display the three pages in the MainPage.xaml. For that , we need to add a Grid control  to the MainPage.xaml  , and resize it to a bigger size.

To Home.xaml , Add a TextBlock control .  Change its content to Home Page. Similarly for the other 2 pages, add TextBlock control and rename their content respectively.
In the XAML view, you can change the dimensions of the newly added pages.   Modify the d.DesignWidth  to 300   and d.DesignHeight  to 300 , for all the three pages.
 

Step 3.  Navigating between the pages.
In the MainPage.xaml, double click on the Home button. 
The default click event handler is generated , and there we need to enter the following code.

   grid1.Children.Clear();

   grid1.Children.Add(new Home());


The grid which was added to MainPage.xaml  is named grid1.     grid1.Children   contains all the items present in the grid.    The clear()  method  removes any existing content .
New Home()   creates an object of the Home page. We are essentially adding the home page to the grid using the above code.


Similarly, add the Page1.xaml and Page2.xaml  to the other 2 buttons respectively.

Now Run the project by pressing F5


So we are able to navigate to other pages here .  


Step 4.  Conditional Navigation.
This conditional navigation can be better understood from this example.  
 Suppose a user wants to log in to our system. If the username or password both are correct, he has to be redirected to the home page, or else, he has to be directed to another page.

So we’ll create a new Silverlight Application.
 Name it Lesson2Login. 

Add Two pages  HomePage.xaml  and ErrorPage.xaml , and rezise them to have height and width 300.  To each Page, add a TextBlock  and name it Home and Error  respectively.

Add two TextBlocks, Two TextBoxes, a Button and a Grid to the MainPage.xaml.
Position and rename them appropriately , as shown


 Lets assume the correct username and password are Silverlight and Silver.
Double click on the mouse and enter the following code.
if (textBox1.Text == "Silverlight" && textBox2.Text == "Silver")
            {

                grid1.Children.Clear();
                grid1.Children.Add(new HomePage());

            }
            else
            {
                grid1.Children.Clear();
                grid1.Children.Add(new ErrorPage());
               
            }

As you can see, we are checking the value of username from textbox1.text  and the value of password from textbox2.text .   When they match, the HomePage is displayed.  Else , the Error Page is displayed.


This is a simple example of conditional Navigation.  A more detailed application, exploring many other controls , is built and explained  in this video.