Pages

Saturday, 28 April 2012

Coming up next on Xaml and More ...

Hi Guys,
   This is just to give you the heads up on whats coming next on Xaml and more.  Instead of only showing you how to do a task, i have made up my mind to develop fairly useful applications.  They could be anything from workflow designers (he , he  i have seen lots of people with queries on that )   to social networking sites (in silverlight , of course)

We will explore a vast combination of things related to Silverlight .
Well, maybe not that vast, but still you'll be able to understand it pretty fast.
Here are few of the things we'll dive deep into .

1) Silverlight pivot viewer
2) Bing Maps
3) MVVM ,Prism
4) Silverlight Business Applications
5) Custom controls
6) Windows Phone Apps.
7) XNA  ( i think it comes in the more part  of Xaml and more ...)
8) 3D in silverlight
9) Windows 8 development

We will create several applications through this journey , and i hope it will be a great learning experience for both you and me.
In case you find anywhere that things can be done in a better way in my code, please offer your valuable suggestions , and we will try to improve .

 Some of the ones in my mind are

1) A Workflow creator.
2) A Social networking site.
3) A Chat client (Maybe we can explore networking and stuff here)
4) A Silverlight Content Management System ( a basic one, but should get you going)
5) An Online examination Portal
6) An Image editor in Silverlight (where we can try our hand at Bitmaps and layers and cool stuff)

I am going to start making the video tutorials and podcasts in parallel . So keep waiting for a few more days.  Meanwhile you guys could keep encouraging me by giving new ideas for the tutorials  :D

And from now onwards, i will try to post my code samples on Sky Drive and share them here.

Bindings in Silverlight - Bonus post :)

Hi ,
  I was just experimenting with the listbox and combobox ,and decided to combine and use the two together. 
 Effectively,  I want to have a listbox , which contains several combo boxes instead of regular text. 

 And it should all be done with data binding.

So the first step is to create sample data.
 With this requirement in mind, i  decided to create a few classes.

  public class MyObject
    {
        public int Id { get; set; }
    }

  public class encaps
    {
        public List<MyObject> mylist{get;set;}
    }

 As you can see, the data i want to display in the ComboBoxes are integers.  The objects of encaps will be the ItemSource for the Listbox .

We need to bind data to the listbox, and each of that data inturn should be bound to a combo box. So we make use of List<> collection. Create the sample data as shown below.


         List<encaps> l = new List<encaps>();

            for (int j = 0; j < 10; j++)
            {
                List<MyObject> myo = new List<MyObject>();
                for (int i = 0; i < 10; i++)
                {
                    MyObject m = new MyObject();
                    m.Id = i*j;
                    myo.Add(m);
                }
                encaps e = new encaps();
                e.mylist = myo;
                l.Add(e);
            }

            listBox1.ItemsSource = l;
         
The second step is to  create Data templates for the listbox and combobox to display the items.   So you need to change the xaml accordingly.


  <ListBox Height="193" HorizontalAlignment="Left" Margin="48,28,0,0" Name="listBox1" VerticalAlignment="Top" Width="325" >
            <ListBox.ItemTemplate>
                <DataTemplate>
                    <ComboBox ItemsSource="{Binding Path=mylist}" >
                        <ComboBox.ItemTemplate>
                            <DataTemplate>
                                <TextBlock Width="35"  Height="35" Text="{Binding Path=Id}" />
                            </DataTemplate>
                        </ComboBox.ItemTemplate>
                     </ComboBox>
                </DataTemplate>
            </ListBox.ItemTemplate>
        </ListBox>


Observe the bindings here.  The property Id is retrieved from the mylist because the Combobox is exposing that to the TextBlock.    We get our required output, without much effort at all  :)  This can be great for scenarios where you need to show multiple combo boxes . And that's it. We are done .


I haven't changed the width of the combo boxes. You can set them in the Xaml for a nice look and feel.
This same scenario can be done for a data grid also. Just try experimenting and see if it works . All the best :)

Monday, 23 April 2012

Bindings in Silverlight - Binding to ListBox

Hi, and welcome back.  this is the last post of the Bindings in Silverlight Mini Series .  In this we will see how we can bind data to the ListBox. We will make use of Templates for customising the display.

1) We will write the familiar classes - One for providing us the data and one for the Converter

  public class Vals
    {
        public int val1 { get; set; }
        public int val2 { get; set; }
        public  Vals(int n1,int n2)
        {
        val1 = n1;
        val2 = n2;
        }
    }


    public class MyConv : IValueConverter
    {
        public object Convert(object value, Type targetType, object parameter, System.Globalization.CultureInfo culture)
        {
            int i = Int32.Parse(value.ToString());
            if ( i > 6  &&  i % 5  != 0  &&i  <14  )
            {
                return "Red";
            }
            else if (i < 10)
            {
                return "Blue";
            }
            else
            {
                return "Green";
            }
        }
        public object ConvertBack(object value, Type targetType, object parameter, System.Globalization.CultureInfo culture)
        {
            throw new NotImplementedException();
        }
    }


2) Now that we have them in place, lets go and add ListBox to the Xaml , and use an ItemTemplate  to customise it.

 <ListBox Height="345" HorizontalAlignment="Left" Margin="24,12,0,0" Name="listBox1" VerticalAlignment="Top" Width="255" >
            <ListBox.ItemTemplate>
                <DataTemplate>
                    <StackPanel >
                        <TextBox  Background="{Binding Path=val1, Converter={StaticResource myConvStatic} }" Text="{Binding val1}" Width="50"></TextBox>
                        <TextBox Background="{Binding Path=val1, Converter={StaticResource myConvStatic} }" Text="{Binding val2}" Width="50"></TextBox>
                  </StackPanel>
                </DataTemplate>
            </ListBox.ItemTemplate>
        </ListBox>


3)  As you can see , the ItemTemplate of the ListBox contains a DataTemplate tag.  It is the model for how your data should be presented. It can contain only one item , so we use a StackPanel /grid/Canvas  type of structure, to add multiple items .  In case you only want a single item like a textbox, then we can use that directly.

4)   Now add some data to your program in the MainPage constructor
  
           List<Vals> a = new List<Vals>();
            for (int i = 1; i < 10; i++)
            {
                a.Add(new Vals(i*2,i*5));
            }
            listBox1.ItemsSource = a;

Run your program  and you will see the following output.

This ends this Mini Series. Hope you enjoyed the bindings in Silverlight.

Bindings in Silverlight - binding Textbox to a Datagrid

Hi , and welcome back. Now that you have seen how to bind data to controls, we will now see how to bind data from one control to another control.  This is an extension of what we have already done.  To bind one control to another , we use the ElementName and Path  properties of the Binding.

So Lets start by creating a DataGrid, and a TextBox .   In the code, create a list of numbers to use as data for the DataGrid.  

List<int> a = new List<int>();
for (int i = 1; i < 10; i++)
{
  a.Add(i *2);
}
dataGrid1.ItemsSource = a;


Now , In the Xaml , write the following binding for the Text property of the TextBox

Text="{Binding ElementName=dataGrid1, Path=SelectedItem}"
If you observe, we are using the ElementName to specify the element to which this is bound , and the path to specify which property of the element it is bound to.  Currently, i have chosen to use the SelectedItem property.   It is very important that all properties are CaseSensitive. In case you misspell, it will not cause any excaption, but it will not display anything either.


Now we need to talk a little about binding Modes .  there are 3 modes for binding in silverlight :
1)One time   2)One Way  3)TwoWay

Lets say you have two textboxes A and B to illustrate
A has the text "A" , and B is empty "".

In One Time, you obviously understood, that data is bound only once while the control is loading , and then there is no binding between the elements.  So when it loads, the content of B becomes A , and then if you  change the text of A , the value in b doesn't change.

In One way binding, which is the default option, you can always get the updated value to the bound element .  In one way binding, whatever the value of A , that value of B is also the same.However, if you change the value of B, there is no change in A.

In Two Way binding, change in value of any of the element results in a change in the value of the other.  For example , any change to A is accompanied by a change to B, and vice versa.

Now to make things more interesting with a demo , so add another TextBox to the screen.  Lets bind this to the textBox1's text property.  and set the mode to TwoWay.
 So for the textBox2 's  text property,

 Text="{Binding ElementName=textBox1, Path=Text,Mode=TwoWay}"
 Now any change to textbox2 should change textbox1.

You can notice a few things additionally in this example.
When you click on the datagrid values as the application loads , the contents of both the  textboxes change.
When you change the content of textBox 1, the contents of textbox2 change.


However, when you change the contents of textbox2 , and then click on the datagrid, the binding to the datagrid wont be valid. Clicking on 12 in dataGrid will not change the data in the textBoxes.

 Just experiment with the bindings with other controls and see more features of binding. In hte next post, we will use bindings and converters to change the color of the listboxes.  And that will be the last post of this mini series on basic bindings . See you next time. 

Wednesday, 18 April 2012

Bindings in Silverlight - DataGrid and Converters

Hi,   In this post, we will see how to manipulate the data which we send to the data grid which has a binding.

Consider this scenario.  You have data, which has marks from 0 to 50.  You want to represent the marks on the grid, with colors indicating performance.  For example, all marks lesser than 25 are displayed in Red, and the others are displayed in green.

To implement such a scenario, we can make use of the concept of converters. We take the bound value that is to be checked, and pass that to our user defined class . This class returns the appropriate converted value and the returned value is bound to the data grid.

There are a few simple steps to use converters successfully in your program.
1) Create a custom class, that implements the IValueConverter interface .
2) Write your custom logic within the convert method of the above class.
3) In xaml, create a resource for this class in the <UserControl.Resources> section.
4) Modify the DataTemplate for your Data Grid Columns explicitly.

Step 1 & 2 :  Lets create two classes , one is the user defined data class, and the other is the class which implements the converter.

   public class Vals
  {

    public int val1 { get; set; }
    public int val2 { get; set; }

    public Vals(int i1, int i2)
     {
       val1 = i1;
       val2 = i2;
     }

 }

    public class myDataConv : IValueConverter
    {
        public object Convert(object value, Type targetType, object parameter, System.Globalization.CultureInfo culture)
        {
            int str = Int32.Parse(value.ToString());

            if (str > 25)
            {
                return "Green";
            }
            return "Red";
        }

        public object ConvertBack(object value, Type targetType, object parameter, System.Globalization.CultureInfo culture)
        {
            throw new NotImplementedException();
        }
    }


 Step 3:

Add a namespace reference  in the main usercontrol definition tag along with the other references.

xmlns:alocal="clr-namespace:DemoDataGrid"


Then add the converter class in the <UserControl.Resources> tag.

<UserControl.Resources>
        <alocal:myDataConv x:Key="mystylekey"></alocal:myDataConv>
</UserControl.Resources>


Step 4:

Modify the data template of the DataGrid Column.

        <sdk:DataGrid AutoGenerateColumns="False" Height="170" HorizontalAlignment="Left" Margin="80,56,0,0" Name="dataGrid1" VerticalAlignment="Top" Width="222" >
            <sdk:DataGrid.Columns>
                <sdk:DataGridTemplateColumn>
                    <sdk:DataGridTemplateColumn.CellTemplate>
                        <DataTemplate>
                            <TextBlock Text="{Binding val1}"  Foreground="{Binding Path=val1, Converter={StaticResource mystylekey}}"></TextBlock>
                        </DataTemplate>
                    </sdk:DataGridTemplateColumn.CellTemplate>
                </sdk:DataGridTemplateColumn>
            </sdk:DataGrid.Columns>
        </sdk:DataGrid>

In the Xaml.cs  code file , bind a collection to the Data grid.

List<Vals> myD = new List<Vals>();

for(int i=0;i<20;i++)
{

   myD.add( new Vals(i*3,i*5) );

}

dataGrid1.ItemSource = myD;

 That's it.  The Data template is applied to the Data grid columns.  The Foreground property is bound to val1 , which is passed to the converter. The converter checks the value, and returns an appropriate color for this.


Another interesting aspect of using converters is the use of Converter Parameter .  We can add any string literal as a parameter to the converter in addition to the bound value from Path.  One thing to keep in mind is that only string literals are supported currently, and binding the converter parameter is not allowed.

Using the converter parameter is very simple. In the convert method in the Converter class, you will notice that the second parameter is Parameter.  You can make use of that, or leave it as it is.   And this is what you get as output after you use converters.


Try experimenting with different scenarios . Also, if possible, use a checkbox column, and try to enable disable the checkboxes based on bound values.   More of it in the next post of the series .

Tuesday, 17 April 2012

Bindings in Silverlight - Binding User Defined Data to the Data grid

Now to the second lesson of this mini series : By user defined data , i mean custom classes .  We can create a class Vals , that has two members val1 and val2. We will try to bind the Datagrid with these columns , both automatically and explicitly.

Here are the steps we will follow for automatically generating columns.
1) Create the  user defined class.
2) Define a list/collection of the class objects.
3) Set the autogenerate property of the Datagrid to true
4) Assign the collection to the DataGrid's ItemSource property.

Pretty much the same thing as binding simple data, but it gets more fun when we go into manually generating columns.

Step1: Lets create the user defined class in your Project . Either create a new class file, or write the class in the MainPage.xaml.cs

public class Vals{
public int val1 {get;set;}
public int val2 {get;set;}
}

Thats it. the simplest class i could think of.  If you want to add more fields, go ahead and add them, but make sure that you add the {get;set;} block.   Your datagrid will not display any items, if the getter and setter are absent.


Step 2:  Lets create a sample collection . I tend to create a List  most of the time.

List myData = new List();
for(int i=0;i<10;i++)

 {
 v.val1 = i * 2;
 v.val2 = i * 5;
 myData.Add(v);
 }

 Step 3:  You can change the AutoGenerateColumns  property of the datagrid to True.  By default it will be false.  Once this is done, set the ItemSource  property to myData; dataGrid1.AutoGenerateColumns = false; dataGrid1.ItemsSource = myData; You can run and see your Datagrid with the user defined data.


And now the important part.  Right now, you are having two fields val1 and val2 in your class. Suppose you only want to display one field.  You obviously cant use the AutogenerateColumns=True  alone.

So we need to create the DataGridColumn manually in Xaml , or through code. We will now see how this can be done.

Step 1: In the Xaml code, go to the place where your DataGrid is present.
You can observe that the AutoGenerateColumns property is false. If you don't define that DataGridColumn, you will get an empty datagrid. So replace the above code with the column definitions.

<sdk:DataGrid AutoGenerateColumns="False" Height="189" HorizontalAlignment="Left" Margin="50,51,0,0" Name="dataGrid1" VerticalAlignment="Top" Width="280" > 
<sdk:DataGrid.Columns> 
<sdk:DataGridTextColumn Binding="{Binding val1}">
</sdk:DataGridTextColumn> 
</sdk:DataGrid.Columns>
</sdk:DataGrid>


Now , when you see in your browser, you will find that only one column shows up.


However, you can do all of this in Code, without changing the Xaml. Just write the following code for it.
(Create a DataGridTextColumn and assign proper bindings to it. )

DataGridTextColumn dgc = new DataGridTextColumn();
dgc.Header = "Val1";
dgc.Binding = new Binding("val1");
dataGrid1.Columns.Add(dgc);


Thats it for this part.  Try this out with various combinations and types of collections. More on the DataGrid in the next part , including value converters

Bindings in Silverlight - Binding to the Data grid

Hi there ,
   Here is the first lesson of this mini series !  You all know the Data grid . The most popular data display element on screen . Really !   We can make use of a variety of data sources to populate the data grid.   Of course, as we discussed in earlier posts, Silverlight has no means of accessing databases directly.(We need to use WCF services or other mechanisms to get data into our application.)

The first thing we will try do is to populate the contents of a Data grid using an array.

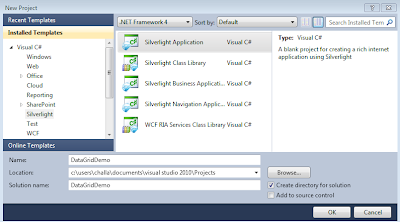
1) Create a new Silverlight Application in Visual Studio . Name it DataGridDemo


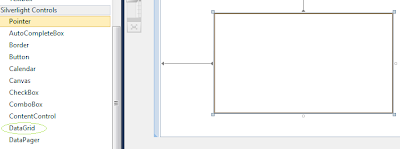
2) Drag a Data grid into the designer .


3) Now drag a button, and double click on it to open the default  click event handler.
    Add the following code to it.


As you can see , we have taken a string and split the letters in it into a character array.   The data grid has an ItemSource property, which can accept any collections.

4) When you run the program, you will see the following output

This is the simplest way of getting data into a Datagrid. 


Exercise for you to try out :

Try creating a List<string> object, fill it with some sample values, and assign it to the ItemSource property of the grid.  You will observe that it is bound exactly the same way as before.

Now that we can use a simple collection, we will take it a step further and try it with user defined classes.